
LiteSpeed Cache Settings: The Configuration That Won’t Break Your Site
The LiteSpeed Cache settings that actually speed up WordPress, the ones that break layouts and forms, and the safe order to turn them on.
Turn on Cache, Cache Exclusions, and Browser Cache first, leave CSS/JS Combine off until you’ve tested it, and change Page Optimization settings one at a time with a purge after each. That order matters more than any single setting on this list. Almost every “LiteSpeed broke my site” support ticket traces back to someone flipping four Page Optimization switches at once and having no idea which one did it.
LiteSpeed Cache is free, sits on WordPress.org with a large install base, and does more than a typical caching plugin because part of it runs at the server level instead of purely inside PHP. That’s exactly why it causes more damage than most plugins when it’s set up carelessly. A cached page that shows the wrong layout is worse for a visitor than a page that simply loads a little slower.
What does LiteSpeed Cache actually do?
The plugin’s settings are split across tabs: Cache, CDN, Image Optimization, Page Optimization, Database, Crawler, and a few utility screens. Each tab controls a genuinely different layer.
Full-page caching, the feature that gives LiteSpeed its reputation, stores a static copy of a rendered page so the server can hand it back instantly instead of rebuilding it from PHP and MySQL every time. That layer specifically needs a LiteSpeed-based server, either LiteSpeed Web Server or OpenLiteSpeed, or the QUIC.cloud CDN service if your host runs Apache or Nginx. Install the plugin on a non-LiteSpeed stack and you still get the CSS/JS optimization, image compression, and CDN integration tools; you just don’t get the server-level page cache that does the heaviest lifting. Confirm which server your host actually runs before you assume you’re getting the full benefit.
What’s the safe order to turn these settings on?
Configure in this sequence and purge the cache after every step, testing the live front end (not the admin preview) before moving to the next one.
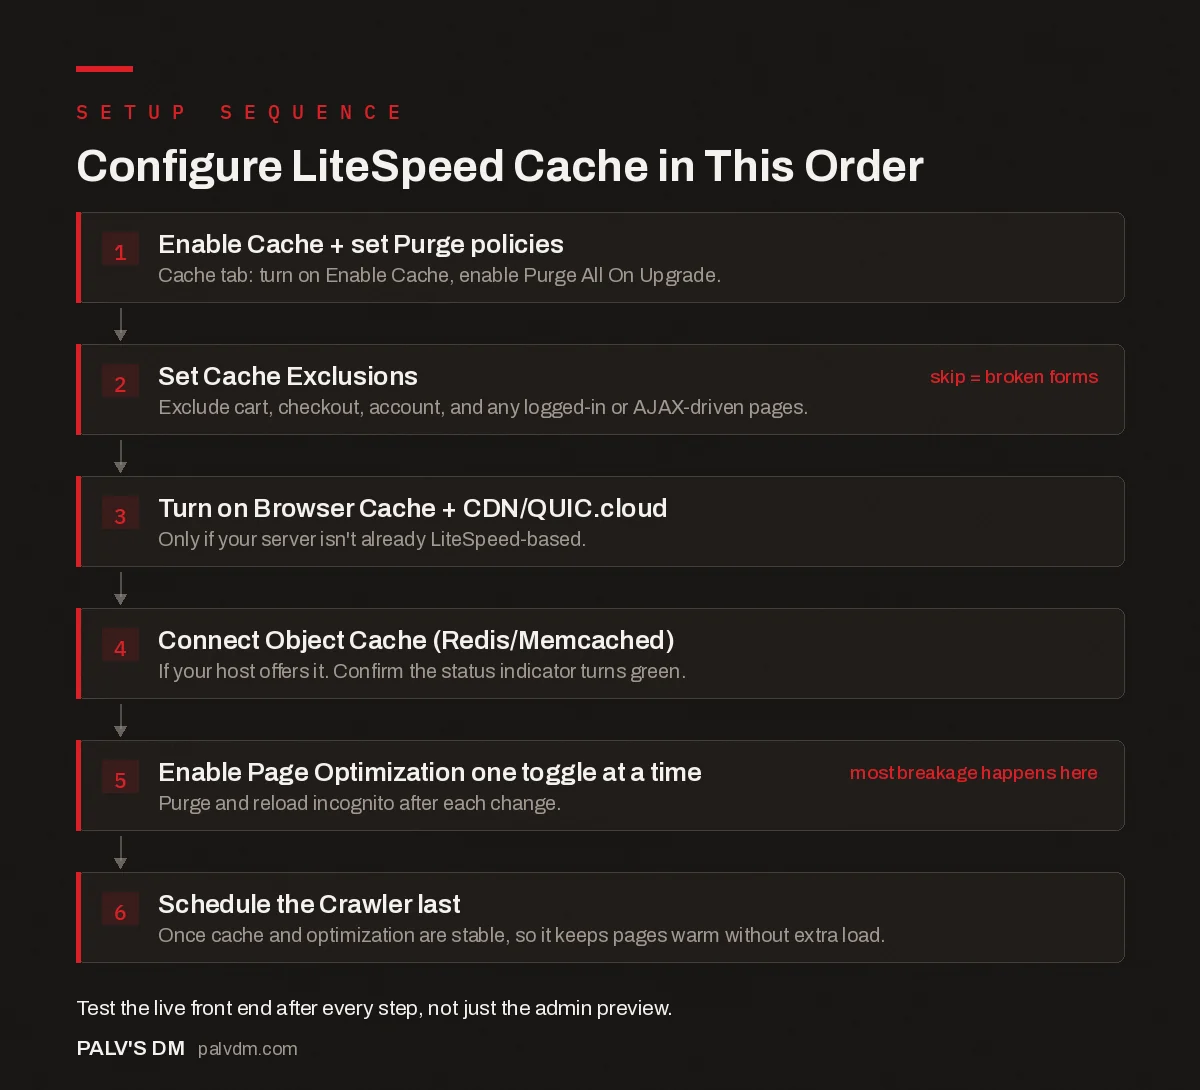
Configure LiteSpeed Cache in This Order
- Enable Cache + set Purge policies. Cache tab: turn on Enable Cache, enable Purge All On Upgrade.
- Set Cache Exclusions. Exclude cart, checkout, account, and any logged-in or AJAX-driven pages. skip = broken forms
- Turn on Browser Cache + CDN/QUIC.cloud. Only if your server isn’t already LiteSpeed-based.
- Connect Object Cache (Redis/Memcached). If your host offers it. Confirm the status indicator turns green.
- Enable Page Optimization one toggle at a time. Purge and reload incognito after each change. most breakage happens here
- Schedule the Crawler last. Once cache and optimization are stable, so it keeps pages warm without extra load.
Which settings cause the most damage?
The CSS/JS Combine setting is the first thing I switch off when a client says a page “looks broken after an update.” Across the setups I’ve configured, it causes more layout and font-loading problems than every other tab in this plugin put together, because it merges files in an order the theme or a page builder didn’t anticipate.
- CSS/JS Combine. Merges multiple files into one. Fast when it works, and the first suspect when styling breaks after a plugin or theme update.
- Load CSS/JS Asynchronously. Can cause a flash of unstyled content if you haven’t also generated Critical CSS for the theme. Test on the homepage and at least one landing page template before trusting it site-wide.
- Remove Query Strings. Rarely causes problems on its own, but combine it with aggressive CDN caching and a versioned asset can get served stale after a plugin update.
- Lazy load applied to above-the-fold images. LiteSpeed lets you exclude specific images from lazy loading. Skip that step and your hero image or logo can delay Largest Contentful Paint instead of helping it.
- Cache Logged-in Users left on by mistake. Fine for membership or forum sites built for it, a real problem everywhere else, since it means the admin bar and personalized content can leak into a cache meant for anonymous visitors.
How do you configure Object Cache with Redis?
Object Cache is a different layer from page caching. Page caching speeds up repeat views of the same URL. Object caching speeds up the database queries WordPress runs on almost every request, logged in or not, by storing query results in memory instead of hitting MySQL again. If your host offers Redis or Memcached, and plenty of managed WordPress hosts do, it’s worth turning on.
In the Cache tab, scroll to Object Cache, set the method to Redis (or Memcached if that’s what’s available), and enter the host, port, and socket path your hosting provider gives you. Save, then check the status indicator the plugin shows once it’s connected. Sites running WooCommerce, a membership plugin, or anything with heavy custom queries feel this the most. A five-page brochure site running on default PHP settings will barely notice the difference.
What about Image Optimization and the Crawler?
Image Optimization queues your media library for compression and WebP conversion through LiteSpeed’s cloud service. Keep “Optimize Original Images” off until you’ve reviewed a batch of converted images; you want compression, not visible quality loss on product photos or portfolio work.
The Crawler tab walks your sitemap in the background so cached pages stay warm for the next real visitor instead of the first person after a purge eating the slow, uncached load. Set a sensible crawl interval and a delay between requests. A crawler set to run too aggressively on a shared hosting plan can eat into the same server resources you’re trying to save, which is a strange way to lose the benefit you just configured.
Which pages need to be excluded from caching?
Go to Cache › Excludes and add anything that has to be different per visitor: cart, checkout, account, and any page built around a logged-in session or a dynamic form. Missing this is the second most common source of “my site is broken” reports, right behind Page Optimization.
- WooCommerce cart, checkout, and my-account pages. Add these to Do Not Cache URIs, not just to Cart/Checkout auto-exclusions, if you’re running a customized checkout flow.
- Forms with AJAX submission. A cached form page can serve a stale nonce, which shows up as “this form has expired” errors for real visitors, not just in testing.
- Anything behind a login (membership content, client portals). Confirm Administrator and any custom logged-in roles are excluded under Do Not Cache Roles.
- Query-string-driven pages like search results or filtered product listings, unless you’ve deliberately configured caching for them.
Does this actually move Core Web Vitals?
Partly, and it’s worth being honest about which part. Server-level page caching mainly attacks Time to First Byte: the server hands back a pre-built page instead of running PHP and hitting the database from scratch. A slow TTFB drags down every other metric that follows it, so this alone is worth doing. It does very little, on its own, for Largest Contentful Paint or Cumulative Layout Shift.
LCP and CLS live in Page Optimization and Image Optimization instead. Deferring render-blocking CSS and JS helps LCP, but only if you’ve excluded the hero image and any above-the-fold fonts from the deferral, otherwise you push the largest paint later, not earlier. WebP conversion trims file size without touching CLS at all. If a theme reserves no space for an image before it loads, LiteSpeed can’t fix that for you; the fix is in the theme’s markup, not the cache settings. Sites that install this plugin expecting a single toggle to fix a bad PageSpeed score are usually disappointed, because caching plugins clean up delivery, not a badly built page.
Where this connects back to SEO: Google’s page experience signals use field data from real Chrome users, not a one-off lab test, so a change you make today typically needs a few weeks in Search Console before you can tell if it actually moved the needle. Don’t judge a settings change by a single PageSpeed Insights run five minutes after you flip it.
Frequently asked questions
Does LiteSpeed Cache work if my host isn’t running a LiteSpeed server?
The plugin installs fine on Apache or Nginx and its optimization tabs still work. Full page caching needs either a LiteSpeed-based server or the QUIC.cloud CDN layered on top. Check your host’s actual stack before assuming you’re getting server-level caching.
Why did my site look broken after I enabled LiteSpeed Cache?
Almost always a Page Optimization setting, not the caching itself. CSS/JS Combine and asynchronous CSS loading are the two most common causes. Turn off every Page Optimization toggle, purge, confirm the site looks right, then re-enable one at a time with a purge and an incognito reload after each.
Do I need Object Cache (Redis) on top of LiteSpeed Cache?
Not required, but worth adding if your host offers Redis or Memcached. Page caching speeds up repeat views of the same URL; object caching speeds up the database queries behind every request. WooCommerce and membership sites benefit the most.
Why is my contact form or cart not working with LiteSpeed Cache on?
The page is being cached along with everything else, so visitors see the same cached state instead of a fresh session. Add cart, checkout, and account pages to Do Not Cache URIs, and check that your form plugin’s AJAX endpoints aren’t being cached too.
How often should I purge the LiteSpeed cache?
You shouldn’t need to manually purge often once Purge All On Upgrade is enabled and TTLs are set sensibly. Manual purges are for right after a content change you need visible immediately, or while testing a settings change. Purging on every save defeats the point of caching.
Sources
- Cache screen reference, LiteSpeed official documentation
- LSCache troubleshooting guide, LiteSpeed official documentation
- LiteSpeed Cache plugin listing, WordPress.org
- WordPress SEO: The Complete Configuration Guide
- WordPress Caching: What Each Layer Actually Does
- WordPress Hosting in India: What to Look For
- Website Maintenance: What Actually Needs Doing Monthly
Want this done on your site?
Every PalV’s DM engagement starts with a free audit of your actual website — a 12-point
crawl covering what is blocking indexation, on-page gaps against your primary keywords, speed
findings, and the three to five fixes worth making first. Delivered in two working days. No
payment details, and the findings are yours whether you hire us or not.
Get your free SEO audit
See Web Development plans and prices